Showing posts with label healthy recipes. Show all posts

Tuesday, December 20, 2011

Happy Hanukkah!

Hello to all of my Jewish friends! I wish you lots of fun and blessings over the next 8 days and nights. How fun that Hanukkah and Christmas overlap this year! We all will be celebrating.


Here are some great resources to add some healthy meals to your Hanukkah table!


Eating Well- healthy recipes and meal planning


The Atlantic- 16 healthy recipes


Food Network- Traditional and healthier versions


Martha Stewart- recipes, crafts and more!


 Eat Better America- Lots of guides on how to make your favorite recipes healthier


Here is a classic favorite- I will be making these soon!

Crispy Potato Latkes

:  December 2005/January 2006


Crispy Potato Latkes Recipe
12 latkes
Active Time:
Total Time:

Ingredients

  • 1 1/2 pounds russet potatoes, (about 2), shredded
  • 1 medium white onion, shredded
  • 2 medium shallots, minced (about 1/4 cup)
  • 1 teaspoon salt
  • 1 large egg, lightly beaten
  • 2 pieces whole-wheat matzo, (6-by-6-inch), broken into pieces
  • 1/2 teaspoon white pepper
  • 3 tablespoons peanut oil, or extra-virgin olive oil, divided

Preparation

  1. Toss shredded potato, onion, shallots and salt in a medium bowl. Transfer to a sieve set over a large bowl; let drain for about 15 minutes. Squeeze the potato mixture, a handful at a time, over the bowl to release excess moisture (don’t oversqueeze—some moisture should remain). Transfer the squeezed potato mixture to another large bowl. Carefully pour off the liquid, leaving a pasty white sediment—potato starch—in the bottom of the bowl. Add the starch to the potato mixture. Stir in egg. 
  2.  Put matzo pieces in a sealable plastic bag and crush with a rolling pin into coarse crumbs. Sprinkle the crumbs and pepper over the potato mixture and toss to combine. Cover and refrigerate until the matzo is softened, 20 to 30 minutes.
  3. Preheat oven to 425°F. Coat a baking sheet with cooking spray.
  4. Heat 1 tablespoon oil in a large skillet over medium-high heat. Stir the potato mixture. Cook 4 latkes per batch: place 1/4 cup potato mixture in a little of the oil and press with the back of a spatula to flatten into a 3 1/2-inch cake. Cook until crispy and golden, 1 1/2 to 3 minutes per side. Transfer the latkes to the prepared baking sheet. Continue with 2 more batches, using 1 tablespoon oil per batch and reducing the heat as needed to prevent scorching. Transfer the baking sheet to the oven and bake until heated through, about 10 minutes.

Nutrition

Per latke: 100 calories; 4 g fat ( 1 g sat , 2 g mono ); 18 mg cholesterol; 15 g carbohydrates; 0 g added sugars; 2 g protein; 2 g fiber; 204 mg sodium; 278 mg potassium.
Nutrition Bonus: Vitamin C (20% daily value).
Carbohydrate Servings: 1
Exchanges: 1 starch, 1 fat

(http://www.eatingwell.com/recipes/crispy_potato_latkes.html)

Thursday, December 15, 2011

Recipe of the Day- Cheese Crackers!

Thanks to my friend Mattie for finding this great recipe! Healthy and delicious...plus, what kid does not love a cheese cracker?!

This recipe comes from 100 Days of Real Food, where a family of 4 cut out all processes food and only ate "real" food for 100 days. It has now become a lifestyle for them and they blog about healthy eating.

"Easy Cheesy Crackers

Ingredients
  • 1 cup whole-wheat flour
  • 5 tablespoons cold butter, cut into tablespoon size chunks
  • 4 oz. or 1 ½ cups grated cheddar cheese…the sharper the cheese the cheesier the crackers
(Yep, that’s it…only 3 simple ingredients!)
Directions
  1. Preheat oven to 350 degrees F.
  2. Combine all three ingredients in a food processor and blend. The mixture will eventually turn into one big ball chasing itself around the bowl. Be patient because it can take a few minutes.
  3. Roll the ball into a log about 1 ½” in diameter. At this point you could refrigerate the dough until later.
  4. With a sharp knife slice ¼” thick pieces off the log (pictured) and place each one flat on an ungreased baking sheet. Try to rotate which side you are cutting down on because the top of the log does start to flatten a little. It is like your very own homemade slice and bake!
  5. If you want your crackers to look a little fancy (as pictured above) take a fork and gently mash down the top of each one before baking.
  6. Bake for 12 – 14 minutes or until golden brown.
These crackers can be stored in the freezer so double the recipe and save some for later!
Yield: Two dozen"


(http://www.100daysofrealfood.com/2011/03/23/recipe-easy-cheesy-crackers/)

Wednesday, November 30, 2011

Toddler Meal Ideas

Need a handy site to jazz up your meals for your toddler?

Well- check out Wholesome Toddler Food! 

Or, check out these quick links on the site:

Breakfast

Lunch 

Snacks

Dinner 


and- my favorite- the meal planner!

Now- anyone who knows me, knows that I do not make separate meals for my son. He eats what we eat. Period. But, there are sometimes when he needs to eat and my husband is not home yet, or when I just need to make my son something quick for lunch and we are not going to eat.

And, most of these recipes can be adapted for the whole family.

Click here to visit Wholesome Toddler Food


Tuesday, November 22, 2011

Healthier Turkey Recipes and MORE!

Check out this great site called Eat Better America for some great healthy recipes for your Thanksgiving dinner!


They take your favorite recipes, and tweak them just a bit to make them healthier and just as tasty as before. There are user reviews to help you know which ones taste great!

Turkey Recipes

Sides Recipes

Desserts Recipes

Appetizers Recipes

Vegetarian Dishes

Drinks

Leftover Ideas


Click HERE to visit Eat Better America and get hundreds of recipes!

Friday, November 18, 2011

Thanksgiving- the healthy way!

Everyone has their favorite recipes for Thanksgiving, but why not incorporate some healthy choices into your meal this year?

I will be posting several healthy recipes over the next week to get you ready- but in the meantime- check out the HUNDREDS of recipes I posted last year! (Including diary free, gluten free recipes too!)

Click HERE to check them out!

Wednesday, November 2, 2011

Meal Planning and Freezer Cooking

In my attempt to save money and make my life easier, I have been working at learning how to meal plan and freezer cook. At first, I thought it sounded so easy...boy was I wrong! I mean, once you get the hang of it- it IS easy. It saves so much time and money. However, it is a skill that needs to be learned and practiced.

It is hard for me- because I am more casual when it comes to eating. Whatever I feel like at the moment, is what I want to eat. I don't like planning out meals, despite being a planner in most other areas of my life. But with me only working part-time and now having two kids- it has become a necessity.

It also has been interesting for me to do this while keeping health in mind. Some freezer cooking options are not the healthiest. Plus, when you eat mostly fresh foods and not as many processed, boxed foods, it is hard to only grocery shop every few weeks and plan ahead.

picture from
http://mamaandbabylove.blogspot.com/2011/04/freezer-cooking-with-slow-cooker.html
BUT- it can be done. I am not going crazy with it, but I am incorporating some ideas into my routine.

Check out some great resources and menu suggestions here:

http://goodcheapeats.com/2011/10/once-a-month-meal-planning-november/

http://fabulesslyfrugal.com/freezer-meal-recipes-master-list

http://www.mommyhatescooking.com/recipe-index

http://www.aturtleslifeforme.com/2011/06/freezer-meals-on-cheap.html

http://mamaandbabylove.blogspot.com/2011/04/freezer-cooking-with-slow-cooker.html


It is the same principal as making your own baby food. You control the ingredients, you save money, and buy spending some time once in awhile, you save time on a daily basis by having the food ready to go!

So- let me know! Do you do freezer cooking or meal planning? Tips? SHARE!


Wednesday, October 26, 2011

Recipe of the Day- Pumpkin Spice Muffins!

From the Pioneer Woman...another use of my favorite ingredient- PUMPKIN!

Pumpkin Spice Muffins


(photo from http://thepioneerwoman.com/cooking/2009/10/moist-pumpkin-spice-muffins-with-cream-cheese-frosting/)

Ingredients

  • 1 cup All-purpose Flour
  • 1/2 cup Sugar- (I would substitute some agave nectar/honey and molasses here a total of about 1/4-1/3 cup)
  • 2 teaspoons Baking Powder
  • 1-1/2 teaspoon Cinnamon
  • 1/4 teaspoon Ground Ginger
  • 1/2 teaspoon Nutmeg
  • 1/2 teaspoon Salt
  • 4 Tablespoons Butter, cut into pieces
  • 1 cup (heaping) Pumpkin Puree
  • 1/2 cup Evaporated Milk
  • 1 whole Egg
  • 1-1/2 teaspoon Vanilla
  • 1/2 cup Golden Raisins (optional!)
  • Preparation Instructions

    Preheat oven to 400 degrees. Generously grease 12 muffin tins.
    Sift flour, sugar, baking powder, cinnamon, ginger, nutmeg, and salt. Cut in butter with two knives or a pastry blender until it is fully incorporated. In a separate bowl, mix together pumpkin, evaporated milk, egg, and vanilla. Pour pumpkin mixture into the flour mixture. Add raisins. Fold gently until mixture is just combined.
    Pour into a greased muffin pan—batter hardly ever fills all twelve unless you keep it down to 1/2 full. Sprinkle with remaining cinnamon-sugar-nutmeg mixture over the top of each unbaked muffin.
    Bake for 25 minutes. Allow to cool in pan for 15 minutes, then remove and allow to cool
 She tops her muffins with a cinnamon sugar mix and then frosts with cream cheese frosting, but I think the basic recipe is healthier and just as delicious!

(http://thepioneerwoman.com/cooking/2009/10/moist-pumpkin-spice-muffins-with-cream-cheese-frosting/)

Sunday, October 2, 2011

Recipe of the Day- Agave Banana Spice Cake (No refined sugar!)

Healthy and delicious! Also great for little ones, as long as they have had milk, eggs and wheat flour. (About 12-18 months)

  • 4 ounces butter, softened
  • 1/2 cup agave nectar
  • 1 tablespoon molasses
  • 1 large egg
  • 2 to 3 bananas, mashed, about 3/4 cup
  • 1/4 cup buttermilk or sour milk- (check out easy substitutions HERE)
  • 1 teaspoon vanilla extract
  • 1 1/2 cups all-purpose flour
  • 1 1/2 teaspoons baking powder
  • 1/2 teaspoon baking soda
  • 1/2 teaspoon salt
  • 1 scant teaspoon ground cinnamon
  • 1/8 teaspoon ground cloves
  • 1/8 teaspoon ground nutmeg

Heat oven to 350°. Grease and flour an 8- or 9-inch square pan.

In a large mixing bowl with electric mixer, cream butter, agave nectar and molasses. Beat in egg, milk, vanilla, and mashed banana until blended. Combine remaining dry ingredients and spices. Stir the dry ingredients into the first mixture until moistened. Spread in prepared pan.

Bake for 25 to 30 minutes, or until cake springs back when lightly touched with finger. 


Tuesday, September 13, 2011

Recipe of the Day- Carrot Cake Agave Muffins!

 Carrot Cake Agave Muffins: – Makes 36 muffins


1 cup Organic Amber Agave Nectar
4 large eggs
1 cup canola oil
3 cups shredded fresh carrots
2 1/4 cups whole wheat flour
1 tsp baking soda
1 tsp baking powder
2 tsp cinnamon
1/2 tsp salt

Preheat oven to 350 F.
Prepare 3 – 12 cup muffin pans with liners. In a large bowl, combine agave, eggs, and oil, beat well. Stir in carrots. In a separate bowl, combine dry ingredients. Blend in batter. Fill cups only half-way for proper baking. Bake 22 to 25 minutes until the center of a muffin springs back when lightly touched.


YUM!

Saturday, September 3, 2011

Recipe of the Day- Grilled Veggies!

A GREAT idea for babies, toddlers, kids and adults! Everyone will love the selection and the sweetness added by the balsamic vinegar. Check out this great recipe from Giada and the Food Network- or come up with your own variation. Labor Day is the perfect time to grill with the family.


Grilled Vegetables


Ingredients

  • 3 red bell peppers, seeded and halved
  • 3 yellow squash (about 1 pound total), sliced lengthwise into 1/2-inch-thick rectangles
  • 3 zucchini (about 12 ounces total), sliced lengthwise into 1/2-inch-thick rectangles
  • 3 Japanese eggplant (12 ounces total), sliced lengthwise into 1/2-inch-thick rectangles
  • 12 cremini mushrooms
  • 1 bunch (1-pound) asparagus, trimmed
  • 12 green onions, roots cut off
  • 1/4 cup plus 2 tablespoons olive oil
  • Salt and freshly ground black pepper
  • 3 tablespoons balsamic vinegar
  • 2 garlic cloves, minced
  • 1 teaspoon chopped fresh Italian parsley leaves
  • 1 teaspoon chopped fresh basil leaves
  • 1/2 teaspoon finely chopped fresh rosemary leaves

Directions

Place a grill pan over medium-high heat or prepare the barbecue (medium-high heat). Brush the vegetables with 1/4 cup of the oil to coat lightly. Sprinkle the vegetables with salt and pepper. Working in batches, grill the vegetables until tender and lightly charred all over, about 8 to 10 minutes for the bell peppers; 7 minutes for the yellow squash, zucchini, eggplant, and mushrooms; 4 minutes for the asparagus and green onions. Arrange the vegetables on a platter. The key to getting those great grill marks is to not shift the vegetables too frequently once they've been placed on the hot grill.
Meanwhile, whisk the remaining 2 tablespoons of oil, balsamic vinegar, garlic, parsley, basil, and rosemary in a small bowl to blend. Add salt and pepper to taste. Drizzle the herb mixture over the vegetables. Serve the vegetables, warm or at room temperature.


(http://www.foodnetwork.com/recipes/giada-de-laurentiis/grilled-vegetables-recipe/index.html)

Thursday, August 25, 2011

Free ebook about Wholesome Eating!

I found a great site called The Morris Tribe about a woman who quit the working world to become a stay-at-home Mom to 9 kids. Yes, 9 kids!! She is honest and so candid about how hard that transition from working to homemaking is...which I can TOTALLY relate to.The book is great and the site is full of inspiration for all parents.

About "Just Get 'Em Fed!", her free ebook about feeding your family whole foods that they will enjoy:

From The Morris Tribe:

"For all of history, the place where food is prepared is where the family unit gathers.
Food bonds people together.  There’s something beautiful about when people eat with one another.  We feel close and related.  The conversation extends a little longer, we smile a little wider and we digest our food better.
Like it or not, moms, what comes out of the kitchen binds the family relationships.  By design or by default, we can greatly influence the mood and temperature of our homes with food.

As a busy mom with 10 people to feed most days, sometimes more, it’s important to get my act together in terms of buying, preparing and serving food.  Yet, Martha Stewart I am not.
That’s why I wrote a FREE eBook “Just Get ‘em Fed“.  ”Just Get ‘em Fed” is a whole food cookbook that teaches you to how to cook thematically and simply….to “Just Get ‘em Fed“.
I’ve been all over the place with food, from growing up on junk food, going organic, then vegetarian and then to whole foods.  I share my food journey with you in the cookbook.  I also talk about meal planning and how cooking thematically is so much easier than conventional planning.
Then, recipes that WE eat, that are tried and true….and that your family will love.
It’s completely free! I don’t even ask for an email, it’s just yours for the printing. Take advantage of this free resource, compliments of “The Morristribe”!"

(http://www.themorristribe.com/2011/08/got-family-to-feed-free-ebook-just-get-em-fed/)


Wednesday, August 17, 2011

Recipes of the Day- Grilled Corn & Red Pepper Salad

The littles will LOVE this one!!! This would be great for ages 9 months and up, once you start giving table food. Thanks to Weelicious for another fabulous recipe.

photo from http://weelicious.com/2011/08/15/grilled-corn-red-pepper-salad/


Grilled Corn & Red Pepper Salad (Serves 4)

4 Ears of Corn
2 Large Red Peppers, seeds removed and cut into quarters
1/4 Cup Red Onion, diced
1/2 Tsp Paprika
1/2 Tsp Kosher Salt
2 Tbsp Fresh Parsley, chopped
2 Tbsp Olive Oil
Juice of 1 Lemon

1 Cup Mozzarella Balls, cut into quarters
1. Preheat grill.
2. Grill corn and peppers for 6 minutes and set aside to cool.*
3. Remove the corn kernels from the cobs and dice the red peppers.
4. Place the corn and peppers in a bowl with the remaining ingredients and combine.
5. Serve.

(http://weelicious.com/2011/08/15/grilled-corn-red-pepper-salad/)

Sunday, July 31, 2011

Heathy cakes, no sugar no egg cakes & agave cakes

Since my oldest son is having a birthday...it is time once again for my adventures in healthy cake making!

The first year, I made a no sugar, no egg cake. (The adults had the bad stuff, hehe). Check out that recipe HERE


The second year, I made a no sugar cake, sweetened with agave nectar. I made everyone try it! While most of us are used to the tooth-rotting sweetness of refined sugar, everyone agreed that it was still very good. Check out the recipe HERE


NOW for the third birthday celebration- I am debating between two choices. I am allowing a bit of sugar these days on very rare occasions, so the first recipe does have some...(Even though there is only one cup of total sugar in the recipe between many servings...I still might omit some and substitute some agave nectar)


Blueberry Crumb Cake

(Source: Baking: From My Home to Yours by Dorie Greenspan, pages 192-193)
Yield: 8 servings

For the Crumbs:
5 tablespoons unsalted butter, at room temperature
1⁄4 cup sugar 
1/3 cup (packed) light brown sugar
1/3 cup all-purpose flour
1⁄4 teaspoon salt
1⁄2 cup chopped walnuts (optional)

For the Cake:
1 pint (2 cups) organic blueberries (preferably fresh, or frozen, not thawed)
2 cups plus 2 teaspoons organic unbleached flour
2 teaspoons baking powder

1⁄2 teaspoon baking soda
1⁄4 teaspoon salt
1⁄4 teaspoon ground cinnamon
1/8 teaspoon freshly grated nutmeg
2/3 cup sugar
Grated zest of 1⁄2 lemon or 1⁄4 orange
3⁄4 stick (6 tablespoons) unsalted butter, at room temperature
2 large eggs, at room temperature
1 teaspoon pure vanilla extract
1⁄2 cup buttermilk

Getting Ready: Center a rack in the oven and preheat the oven to 350 degrees F. Butter an 8-inch square pan (Pyrex is great for this) and put it on a baking sheet.

To Make the Crumbs: Put all the ingredients except the nuts in a food processor and pulse just until the mixture forms clumps and curds and holds together when pressed. Scrape the topping into a bowl, stir in the nuts and press a piece of plastic against the surface. Refrigerate until needed. (Covered well, the crumb mix can be refrigerated for up to 3 days.)

To Make the Cake: Using your fingertips, toss the blueberries and 2 teaspoons of the flour together in a small bowl just to coat the berries; set aside. Whisk together the remaining 2 cups flour, the baking powder, baking soda, salt, cinnamon and nutmeg.

Working in the bowl of a stand mixer or in another large bowl, rub the sugar and zest together with your fingertips until the sugar is moist and aromatic. Add the butter and, with the paddle or whisk attachment, or with a hand mixer, beat the sugar with the butter at medium speed until light, about 3 minutes. Add the eggs one by one, beating for about 1 minute after each addition, then beat in the vanilla extract. Don't be concerned if the batter looks curdled - it will soon smooth out. Reduce the mixer speed to low and add the flour mixture and the buttermilk alternately, the flour in 3 parts and the buttermilk in 2 (begin and end with the dry ingredients). You will have a thick, creamy batter. With a rubber spatula, gently stir in the berries.

Scrape the batter into the buttered pan and smooth the top gently with the spatula. Pull the crumb mix from the refrigerator and, with your fingertips, break it into pieces. There's no need to try to get even pieces - these are crumbs they're supposed to be lumpy and bumpy and every shape and size. Scatter the crumbs over the batter, pressing them down ever so slightly.

Bake for 55 to 65 minutes, or until the crumbs are golden and a thin knife inserted into the center of the cake comes out clean. Transfer the cake to a rack and cool just until it is warm or until it reaches room temperature.


The other option is The Vanilla Agave Nectar Cake/frosting

Vanilla Buttercream Frosting
 

Recipe courtesy of Ania Catalano (author of Baking with Agave Nectar)
 
Makes 2 cups (frosts one 9” layer cake)
 
Ania says, “This is my favorite frosting.  It’s a real buttercream, rich and creamy, but not too sweet.  It’s great on any cake or cupcake.”
 
½ cup unsalted butter
6 tbl. Madhava's Light Agave Nectar
1 cup nonfat dry milk
1 ½ tsp. Vanilla extract
4 tbl. Whole milk
pinch of sea salt
 
Cream the butter with an electric mixer until light in color.  Slowly add the agave nectar and beat until fluffy, about one to two minutes.
 
Gradually add the dry milk and beat again.  Add the vanilla extract and the milk, one tablespoon at a time, until completely blended.  Add the salt, turn the mixer to high speed, and beat about two minutes, or until very fluffy. 
 Store in refrigerator for up to 3 weeks.
 
(http://www.madhavasweeteners.com/agave/RecipeDetail.aspx?RecipeID=35)

Agave Sweetened White Cake

Ingredients
  • 3 egg whites
  • 1/2 cup light agave syrup
  • 3 tbsp butter
  • 1 cup flour
  • 1/4 tsp salt
  • 1 1/2 tsp baking powder
  • 1/4 cup water
  • 2 tsp vanilla extract
Directions
  1. Preheat the oven to 325. Grease and flour a 6 inch round cake pan.
  2. Beat the eggs and agave in a mixing bowl on med speed.  Meanwhile, melt the butter being careful not to brown it, and add it to the eggs slowly.
  3. Let the mixer continue to beat the egg mixture while, in a medium bowl, you measure out and combine the dry ingredients (flour, salt, baking powder). Turn down the mixer to the lowest speed and slowly add the dry ingredients. Turn the mixer back up to medium speed once the dry ingredients are moistened and continue to beat, while measuring and adding the water and vanilla extract. Beat until well combined; it will look like thinned out mayonnaise, kind of.
  4. Pour the batter into your pan; pan should be about half full. Bake for 35-40 minutes or until a cake tester inserted in the middle of the cake comes out clean. Remove from the oven and let cool on a rack for 10 minutes. Turn cake out of pan, and let cool completely.
(http://food.tracycarolyn.com/2011/06/agave-sweetened-white-cake-with-vanilla-buttercream/)


I will post pictures once I decide on which one to make! Let me know if you have a favorite "healthy" cake recipe!

Monday, July 25, 2011

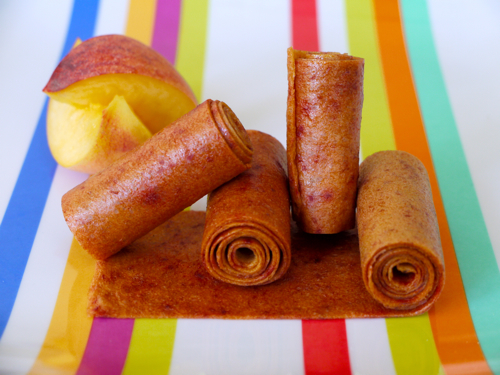
Recipes of the Day- Peach fruit leather and Roasted Tomatillo Salsa

I love Weelicious! You should too...here are two amazing recipes from their site for you and your kiddos to try today.

Peach Fruit Leather

4 Ripe Peaches (skin on)
1 Tbsp Honey

1. Preheat oven to 225 F degrees.*

2. Rinse and remove seeds from peaches.

3. Place the peaches and honey in a blender and puree until smooth.

4. Pour the mixture onto a parchment lined baking sheet and spread with the back of a spoon or spatula in a large rectangle (my rectangle was 11 x 15 inches) making sure that the thickness is completely even.

5. Bake for 3-4 hours or until dry and not sticky to the touch. Remember, cooking times will vary depending on how thick you spread your mixture and how much water (juice) is naturally in the fruit.**

6. Set aside and cool at room temperature; it takes several hours for the fruit to soften up. Note that when you first take the fruit leather out of the oven, the edges will be a bit dry and crispy, but if you allow it to sit out for several hours it softens up nicely.

7. Cut with a knife, pizza cutter or scissors into strips, keeping the paper on if desired, then roll the leather into “roll ups”.

8. Serve.

* If you choose to use a dehydrator, cook the fruit leather at 135 degrees for 5 hours.
** Every oven is different, so the cooking time maybe less than 2 hours if your oven tends to run hot.

 (http://weelicious.com/2011/07/25/peach-fruit-leather/)


Roasted Tomatillo Salsa (Makes 1 1/2 Cups)

10 Tomatillos, husked & rinsed (about 1 lb)
2 Small Garlic Cloves
1 Small Onion, cut into chunks
1/2 Cup Fresh Cilantro, packed
Juice of 1 Lime
1/2 Tsp Kosher Salt

1. Preheat oven broiler.

2. Place tomatillos, garlic cloves and onion chunks on a foil-lined baking sheet and place on the middle rack of the oven. Broil for 10 minutes, remove and set aside to cool.

3. Once cooled, place all of the ingredients into a food processor and puree.

4. Serve with tortilla chips or over grilled fish or chicken


(http://weelicious.com/2011/07/20/roast-tomatillo-salsa/)


Click HERE to visit Weelicious

(photos courtesy of http://weelicious.com/)

Thursday, July 14, 2011

Want to know what ISN't toxic in Cool Whip?

Check out this article- it discusses how bad Cool Whip is for you and why only 2 ingredients are not hazardous to human health!

coolwhip

Cool Whip, invented in the late 1960s, used to be all the rage for housewives perfecting a key lime pie, strawberry shortcake or chocolate mousse for the family. The fluffed whipped cream alternative is a quick-fix for all things dessert-in-a-snap, but nothing about it is reminiscent of real whipped cream. In fact, of the 12 or so ingredients in Cool Whip, there are only two that aren’t toxic to humans—and water is one of those.

It’s hard to resist the charm of Cool Whip: It’s fluffy, it’s sweet, it’s light and, until just recently, it used to be dairy-free. But there’s nothing natural about the stuff. In fact, its ingredients are loaded with chemicals and additives known to be toxic to human health.

Here’s a rundown of what’s inside the Original Cool Whip: Water, hydrogenated vegetable oil, high fructose corn syrup, corn syrup, skim milk, light cream and less than 2% sodium caseinate (a milk derivative), natural and artificial flavor, xanthan and guar gums, polysorbate 60, sorbitan monostearate and beta carotene (as a coloring).

And here’s a play-by-play on just how toxic each of those ingredients may be to our bodies:

Hydrogenated oils: Hydrogenated oils have been shown time and again to cause heart disease by increasing LDL (the bad stuff) and lowering HDL (the good stuff).

(High fructose) corn syrup: Not all calories are alike, and neither are all sugars. Princeton University recently found that corn syrup causes stronger weight gain than regular table sugar—and may also contributete more heavily to obesity and diabetes. And recent studies show it may also contain trace amounts of mercury, which may cause cancer, reproductive disorders and a myriad of degenerative diseases.

Skim milk and light cream: Researchers have found a strong association between skim or fat-free milk and cancer—especially prostate cancer in men.

Sodium caseinate: This dairy derivative has been linked to autism, brain malfunctions and allergies.

Natural and artificial flavor: Come on now. This can really be anything. “N&A,” as dubbed in the food chemistry world, can be from vegetable or animal sources, can contain gluten or chemicals, can be various forms of MSG (which, as a “flavor enhancer,” pops up in most “flavors”).


Xantham & guar gums: These are used as a laxative, in medicines, and as a thickener in foods by mixing sugars and bacteria. In small doses, it shouldn’t pose a problem for individuals, but large amounts can cause diarrhea.

Polysorbate 60: Used in foods and beauty products, this chemically-derived emulsifier has been linked to organ toxicity, diarrhea and tumors in lab mice.

Sorbitan monostearate: This chemically-derived substance is commonly referred to as “synthetic wax”—yes, you’re eating synthetic wax. In numerous studies, this substance has been linked to skin, eye and respiratory irritants to stomach disruptions.

Beta carotene: This might be the sole ingredient in Cool Whip that actually isn’t toxic. Hooray for that!

This summer, when you're making key lime pie or want a perfect garnish for your fresh cherry cobbler, skip the Cool Whip and opt for the real stuff: Homemade Vegan Whipped Cream.
Follow Kimberley on Twitter @GreenGourmetKim
image: vauvau


(http://www.stumbleupon.com/su/1G34As/www.organicauthority.com/health/skip-the-cool-whip-you-dont-want-to-know-what-its-made-of.html)


Saturday, July 9, 2011

Recipe of the day- Strawberry Muffins!

Thanks again to my friend Mattie for finding this recipe from Weelicious!

Strawberry Muffins (Makes 18 Muffins)

2 Cups All Purpose Flour
3 Tsp Baking Powder
1/2 Tsp Salt
1 Large Egg
3/4 Cup Milk (low fat or whole cow’s milk, almond, rice or soy milk will work)
1/4 Cup Vegetable or Canola Oil
1/2 Cup Honey or Agave Nectar
1 Tsp Vanilla Extract
1 Tsp Lemon Zest
1 1/2 Cups Strawberries, chopped

1. Preheat oven to 375 degrees.
2. In a bowl, combine the first 3 ingredients.
3. In a separate bowl, whisk egg and add milk, oil, honey, vanilla, and lemon zest and stir.
4. Using a standing mixer or hand mixer, slowly combine the dry ingredients with the wet until incorporated (try not to over mix the batter).
5. Add the strawberries to the batter and slowly combine.
6. Line or grease muffin tins and fill 2/3 of the way with batter.
7. Bake for 20 minutes or until toothpick tester comes out clean.
8. Cool and serve.

* If you want to make mini muffins, fill 36 muffin cups and bake for 18 minutes or until a toothpick comes out clean.


Click HERE for more recipes from Weelicious


Click HERE to follow Weelicious on Facebook

Thursday, June 30, 2011

Recipe of the day- frozen fruit and yogurt treats!

Courtesy of my friend Mattie, here is a great treat for your little one!

 So easy and yet, so delicious! (my kind of summer cooking!)

1 banana
1-1.5 cup of honey greek yogurt. 

Mix in food processor. 
Pour into popsicle molds. 
Freeze. 
Eat.


Add whatever fruit you like to mix it up!

(For under 1, just be sure to use plain yogurt and not the honey kind)

Wednesday, June 15, 2011

Recipe(s) of the Day- Healthy Summer Desserts!

Yum, Yum! There is nothing better than a cool and sweet treat on a hot summer day...

check out these great ideas for desserts the whole family can have- even your baby!!


Fruit Granita:

Ingredients


  • 1 cup agave nectar (or you could use honey for anyone over the age of one, or other sugar syrup substitute)
  • 1  lemon (up to 2)
  • Fruit of your choice- (quantity varies on how much you want to make. To serve 5 people, you need about 7-9 cups of fruit)

Directions 

  1. Grate 2 teaspoons lemon peel and squeeze 1/4 cup juice. 
  2.  In food processor with knife blade attached, blend fruit until pureed. With back of spoon, press puree through sieve into medium bowl; discard any seeds.
  3. Stir in agave (or honey or other sugar substitute) and lemon juice and mix with fruit puree. 
  4. Pour into 9" by 9" metal baking pan.
  5. Cover and freeze mixture 2 hours or until frozen around edges. With fork, scrape ice at edges into center. Cover and freeze until completely frozen, at least 3 hours or overnight.
  6. To serve, let granita stand at room temperature 15 minutes or until slightly softened. With fork, scrape across surface of granita to form ice shards and spoon into chilled wine goblets or dessert bowls. Serve immediately. 


Fruit Kebabs With Lemon Lime Dip

Dip:
4 ounces low-fat yogurt (you can use organic or greek yogurt for added health benefits, favored in citrus flavors, plain, honey or vanilla)
1 teaspoon fresh lime juice
1 teaspoon lime zest

(and then any fruit you like- here are the suggested fruits from the recipe):
4 to 6 pineapple chunks
4 to 6 strawberries
1 kiwi, peeled and diced
1/2 banana, cut into 1/2-inch chunks
4 to 6 red grapes
4 wooden skewers

In a small bowl, whisk together the yogurt, lime juice and lime zest. Cover and refrigerate until needed.
Thread 1 of each fruit onto the skewer. Repeat with the other skewers until the fruit is gone. Serve with the lemon lime dip.
Serves 2


(http://www.squidoo.com/summerdessert)

Check out this blog on sugar substitutes and...


What are your favorite healthy summer desserts? Share the recipes here!

Tuesday, June 7, 2011

Brown Rice Cereal Recipe- (No more store bought white rice cereal please!)

I have written about using brown rice over white rice before...(if you have not read that post...go ahead and then come back. VERY important stuff!)


Well- how about saving money and making your own brown rice cereal?! Here is the recipe!

Brown Rice Cereal
 
2 oz brown rice powder
8 fl oz water
a little breastmilk

To make the rice powder, grind brown rice in a blender or food processor. This is best achieved by grinding in small quantities - but to make the powder REALLY fine, I recommend trying a coffee grinder.

Bring the water to a boil.

Add the rice powder, stirring constantly with a wire whisk.

Simmer for about 10 minutes (don't forget to keep stirring, or the rice will stick).

Then stir in enough breastmilk  to give the consistency that's best for your baby.

Voila! Easy as pie and SO much healthier and cheaper than the white rice cereal you buy from the store!


Monday, May 23, 2011

Recipe of the Day- Healthy Homemade Pizza

From Eat Better America- 

Healthy Homemade Pizza 
 (http://www.eatbetteramerica.com/recipes/global-flavors/healthified-homemade-pizza.aspx)

I think pizza is the best with kids- even the littlest kid can help put their favorite toppings on. Make sure to add lots of veggies!!


Prep Time:15 min
Start to Finish:45 min
makes:8 servings
Crust
1 1/3cups Gold Medal® all-purpose flour- (I would use whole wheat flour)
1teaspoon baking powder
1/2teaspoon salt
1/2cup fat-free (skim) milk
2tablespoons olive oil
Topping
1 1/2cups shredded reduced-fat mozzarella cheese (6 oz)
1can (14.5 oz) Muir Glen® organic diced tomatoes, drained
1cup fresh baby spinach leaves, coarsely chopped
1cup yellow or green bell pepper strips
1/4teaspoon dried oregano leaves
1/4teaspoon garlic powder
1/8teaspoon pepper
2tablespoons freshly shredded Parmesan cheese
1.Heat oven to 400°F. In medium bowl, mix flour, baking powder and salt. Stir in milk and oil until soft dough forms. (If dough is dry, stir in 1 to 2 tablespoons additional milk.) On lightly floured surface, knead dough 10 times. Shape dough into ball. Cover with bowl; let stand 10 minutes.
2.Place dough on ungreased cookie sheet; flatten slightly. Roll out to 12-inch round. Bake 8 minutes.
3.Sprinkle mozzarella cheese over crust; top with remaining topping ingredients. Bake 15 to 20 minutes or until crust is light golden brown and cheese begins to brown. Cut into wedges to serve.